
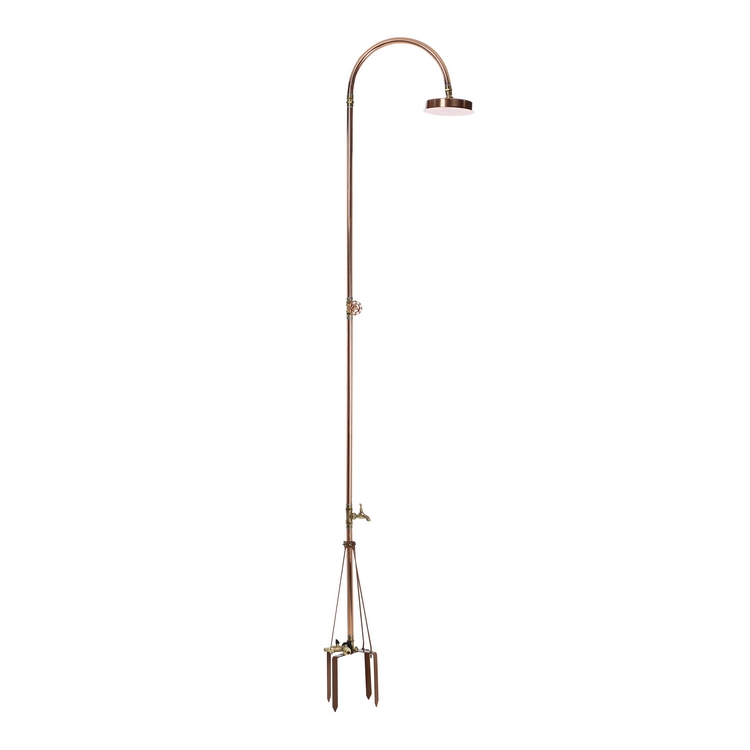
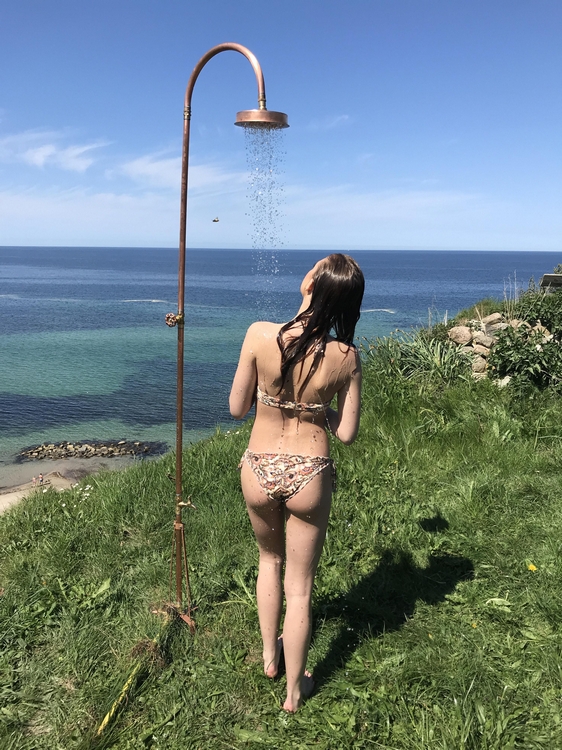
OUTDOOR SHOWER / GARDEN SHOWER VERSION 2018/2019
The updated version of the Outdoor Shower is unique at the danish market:
- Quality product in cobber and brass
- Swedish/Italian classic design
- Fitted for the Scandinavian climate
- 5 years warranty
- Can be assembled in 3 minutes without tools
- Both cold and hot water or only cold.
- Soil / foot for the lawn
- Drain tap for watering can
- Neither packing thread nor packing tape required with rubber gaskets
- Located in molded gift box


VIDEO PRESENTATION OF THE OUTDOOR SHOWER
Order Outdoor shower
As B2B you can contact Excel for ordering. Are you a B2C shopper, we recommend Johannes Fog, Sinnerup DEsign, Wupti etc.
Assembly instructions “Excel Outdoor shower” (garden shower)
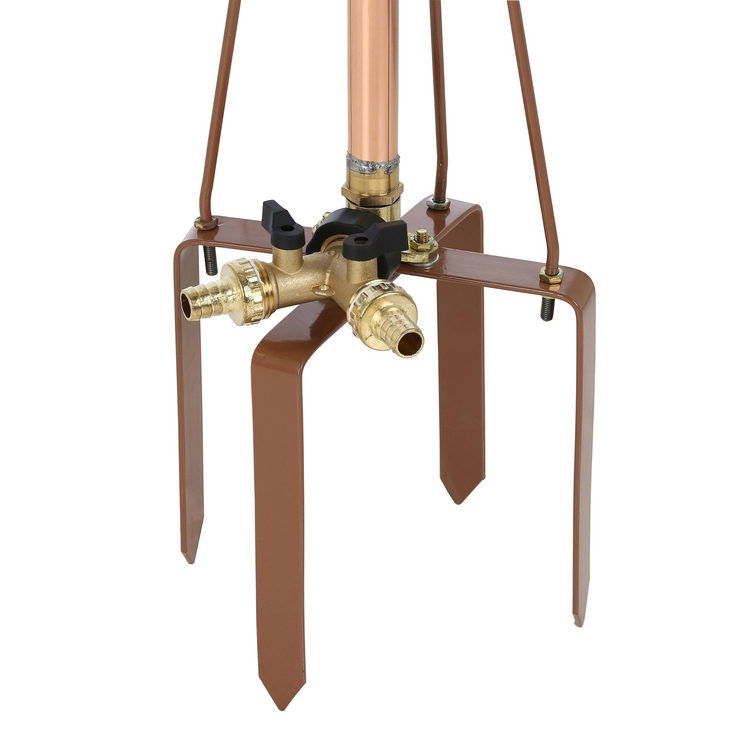
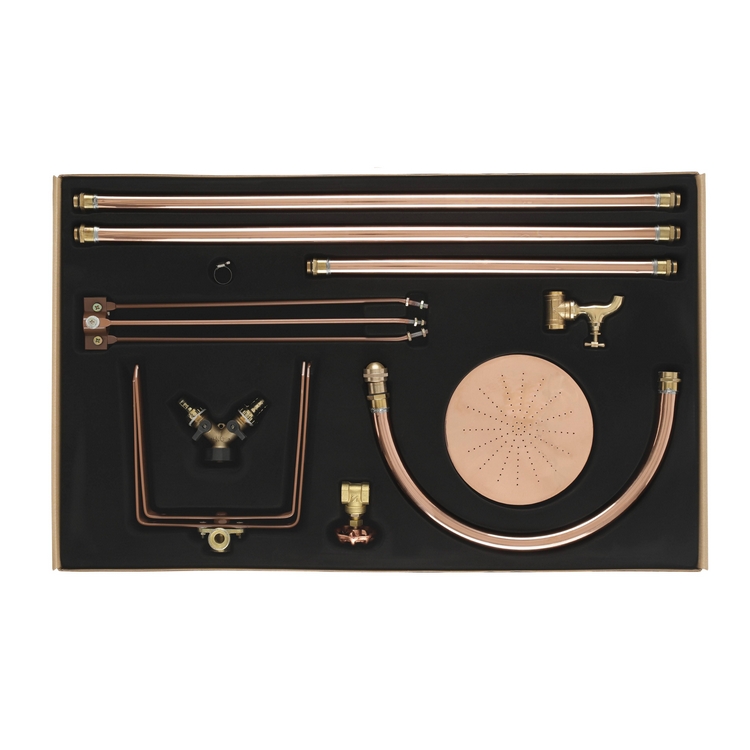
1) Take the foot of the shower – the earth spike (A) – and flip it out. The 3 legs with holes must be placed opposite of the water supply nozzle. Take out the shortest pipe (B) and screw it on to the 90 degree bend – tighten well.
2) (only the copper version) Take the tripod stabilizing pins (J) and fix the mounting brackets loosely around the pipe so that it can be moved up and down. It is fixed with the included wing nuts. Now mount the 3 stabilizing pins onto the earth spike – 3 pins and 3 holes – use the wing nuts to tighten them underneath of the 3 legs of the earth spike.
3) (only copper version) The Y-piece (I) is attached to the water supply nozzle – tighten well. If it is loose, a gasket is missing – check if a transparent gasket is still left in the packaging.
4) Mount the water tap (C)- tighten well.
5) Mount one of the long pipes (D) on the water tap – tighten well.
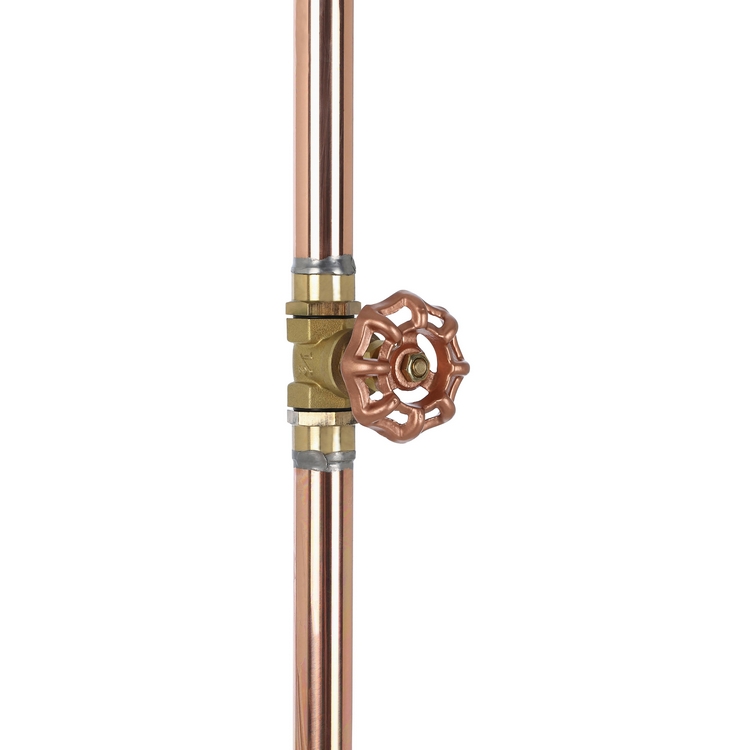
6) Mount the volume knob (E) (on/off water supply) on top of the long pipe – tighten well.
7) Mount another long pipe (F) on top of the volume knob – tighten well.
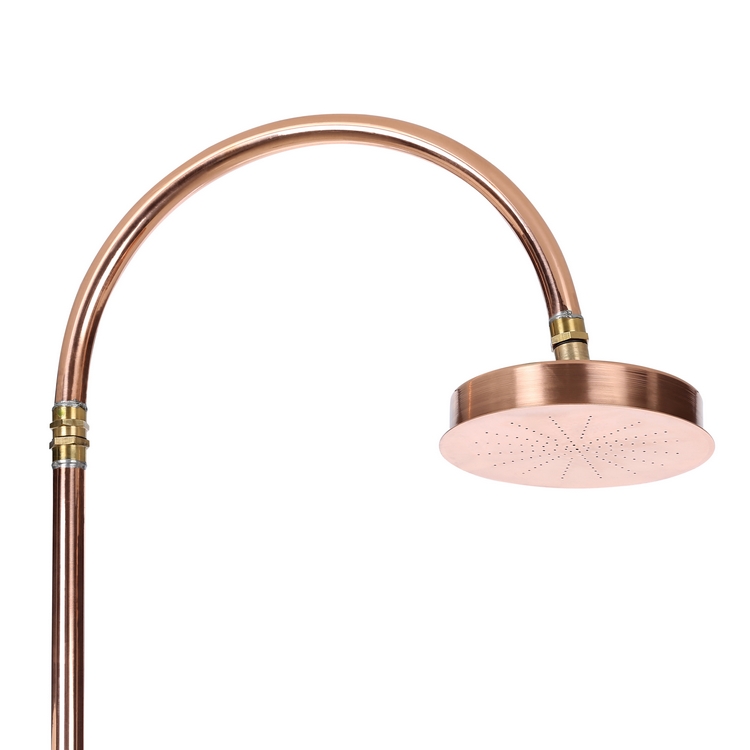
8) Mount the curved pipe (G)on the long pipe – tighten well
9) Mount the shower head (H) incl. ball joint (only ball joint for the copper version) on the curved pipe – tighten well.
10) Press the earth spike into the lawn using your foot. Connect the water hose(s) – 2 clamps (K) (only for the copper version) are included – tighten well.
11) Turn on the water supply and check that there are no leaks.
12) If any leaks – tighten a little more. If this does not help, use some packing yarn (included only for copper version) or change any leaking gasket (extra gaskets are included only for copper version). If there are still leaks in one or more assembles, try instead with pack tape. Or perhaps the pipes have been assembled with a twist? If this does not help, please contact the store where it is purchased or send an email to [email protected]
IMPORTANT CARE INSTRUCTIONS
The installation is made for taking shower and to tap water from the water tap. You should not drink the water from the installation. It is not a drinking water installation.
Do not leave the shower with water pressure on it for a longer period of time!
Drain the shower for water before the temperature hits the freezing point. The warranty does not cover frost explosions.
Change the water frequently in the installation. It can be harmful to leave the water lukewarm due to solar heating for a long time. Let water run through the shower before using it if not in use for some time. Bacteria may occur in the steam of lukewarm water that have been still for some time – it may cause “legionary disease”.
If you do not have access to hot water outside, you can use solar heating of the garden hose as “heat source”. Roll together eg 20-40 meters garden hose and place in the heating sun – a black hose absorbs the heat best. Make sure to use the heated water the same day as it is heated to avoid “legionary disease”
The installation can withstand ordinary heavy winds – but not storm – why in that case it must be taken in or laid down.
The warranty does not include bumps due to the installation being overturned.
## Is the installation too high or too low?
The design is suitable for users who are between 160 cm and 190 cm high.
If you are smaller, one of the long pipes can be replaced with a shorter one – please send an e-mail to excel@excel to receive information about ordering.
If you are higher, the shortest pipe can be replaced with a longer pipe or you can attach an extension piece by writing to [email protected] and receiving information about ordering.
## Mounting on terrace/wood tile with bracket:
Using the terrace bracket. Remove the brass water supply nozzle with the 2 screws from the earth spike (A). Mount the water supply nozzle on the metal bracket using the 2 holes in the middle close to the edge. The water supply nozzle should be turned away from the bracket in order to be able to connect the water hose. The tripod (J) is then mounted in the 3 remaining holes on the bracket.
## Spare parts:
Spare parts can be ordered by sending an email to excel@excel – please send picture of the spare part in order to avoid any misunderstandings.
In general there is no maintenance for the copper shower. However, the shower is delivered with a service kit including extra gaskets and packing yarn. The shower is high gloss polished and appears shiny and gold-like from new. Over time, the color of the shower will turn more red and dark and on an even longer term, it will get green due to corrosion (patina). If you want to keep it shiny and gold-like, you can use a polishing paste like Brasso Autosol or similar. If you want to accelerate the appearance of the green color, you can treat the surface with pH<7 or leave the pipes in the ground for a couple of weeks.
NOTE: When using a chemical treatment or leaving the shower in the ground, the warranty will no longer be applicable.
## For service and defects as well as warranty claims, please write to [email protected]